How to Hand Dye Wool using Food Colouring and White Vinegar.
I am very honoured to have been asked by Rainbow Valley Crochet to write an article for her blog.
One of the reasons I started hand dying myself was because I really love long colour changes and couldn't readily find them. I specialise in long colour change rainbows and sock yarns that self-stripe when knitted, I mostly use Merino wool blends as I only like the really really soft wool. For years I didn’t knit or crochet with anything other than cotton or acrylic as I found most wools scratchy and itchy, then I found merino and fell in love with it :-) The yarns I sell on my website are mostly Merino based, Merino/Nylon, Merino/Tencel, Merino sparkle and my favourite is Merino/Bamboo, it is so soft and has the most gorgeous sheen to it, bamboo was one of my favourite fibres to use before I found Merino as it has a lovely drape to it. I also sell some Blue Faced Leicester which is beautiful and soft too and a favourite of some of my customers.
Here is an easy to follow tutorial on how to hand paint a long colour change rainbow on wool. The yarn must be animal fibre or at least 50% animal fibre for this tutorial to work, as Synthetic/Cellulose fibres wont dye with this method. I use items that are easy to get hold of and food safe so great for doing with your children :-)
You can buy the undyed wool from eBay. I recommend buying superwash as there is less chance of felting it as you are dyeing it.
What you need:-
Knitted sock blank, Glass bowl, Non-natural food colours, White vinegar, Squirty bottles/small containers, Clingfilm, Microwave/steamer, Kitchen towel, small spoon, Jug, Washing up liquid, Gloves.Optional:- Syringe, Sponge painting brush, Measuring spoons.

The first thing I do is knit up the sock blank, this takes the longest time and is the hardest part :-) I have a knitting machine but you could do it by hand. If you knit the yarn up double thickness, you will have two identical balls to make a pair of socks.
Once the blank is knitted, soak it for 30 minutes in a glass bowl in a solution of white vinegar and cold or tepid water. I use approx. 12 tablespoons (180ml) of white vinegar to 1500 ml of water.

Once the wool has soaked, gently squeeze out the excess water.
Lay out some Clingfilm on the table with the sock blank on top leaving plenty of Clingfilm all round it.
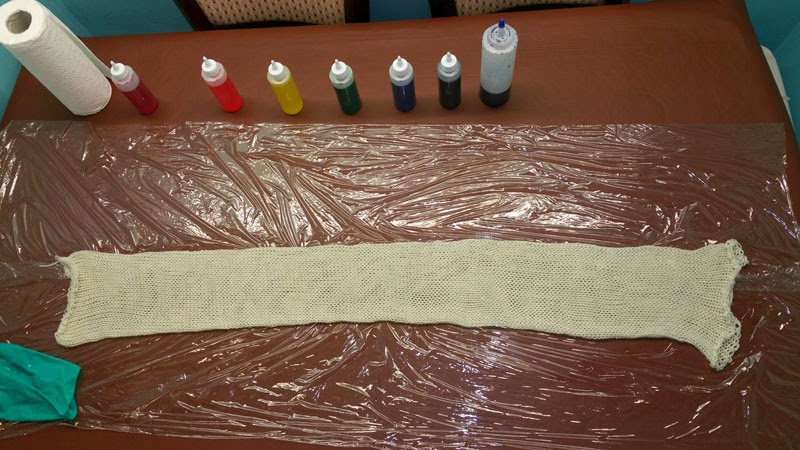
To make the dyes I use food colouring, you have to make sure they are NOT natural colours. I use Sugarflair paste colours as these are very concentrated, they have a wide range of colours and you only need to use a little bit. You can buy them online or from most cake decorating shops.
Start by adding a small amount (tip of a teaspoon) to approx. 100ml of water, (you can use warm tap water to help the pastes dissolve). The more colour you add, the stronger the colours will be. Mix the colours you want to use with the water. Put them into squeezy bottles or any containers you have if you are using a syringe/sponge brush to paint with. You are then ready to paint your yarn!

This can be done in many ways, different way will produce different effects. This is the fun part, play and see what you can come up with.
You can use a syringe to squeeze colour onto the yarn or use a sponge to press it on or even tip the liquid on little by little.
The colour will soak into the yarn and leave clear water behind. Use the kitchen towel to soak up any excess liquid. If the liquid is clear this is a sign that the yarn can take some more dye if you want it too.

If the liquid still has some colour left in it then the yarn is saturated and taken in all the colour it can.
Repeat the process until you have your desired pattern.


Once you are happy with your design, use the Clingfilm to wrap the yarn making sure there is nowhere for the steam to escape.
Put it on to a microwaveable plate and cook in the microwave on high.
You need to cook it long enough to create steam but not too long as to damage the yarn.
I start with 2 minutes on high, then check it. If it doesn’t look like it has steam inside, I put it on for another minute at a time till I can see steam. This is what sets the colour and stops it washing out.

You can also put the yarn in the top layer of a steamer and leave for 30mins.
After the yarn has cooled down naturally, give it a wash under the tap. Use a little bit of washing up liquid to wash out any leftover dye, rinse until the water runs clear, then leave to dry.
Once the yarn has dried it is ready to use, you can either knit straight from the sock blank or wind into a ball.

Hand-dyed yarn should only be hand washed, there are some care instructions on my website.
I hope you have found this helpful and informative, there are many different ways of hand dying yarns this is just one of the ways it can be done and the amounts and measurements are just my personal preference, Have fun!!


